
Sunday, December 22, 2013
Thursday, November 21, 2013
Portraiture 101

What makes a good portrait? Photographing people is the most common and, in many ways, the most rewarding but challenging task for photographers. We all know a good picture when we see one but what is it that makes the good photos stand out? Is it because it is an especially good likeness? A photograph will always be a true likeness, even when we think it isn't. How many times have you heard someone say "that doesn't look like me at all"?
The reason for this is that we are used to seeing people moving around, at least their faces, and in some kind of context, doing something or talking to us. So what makes a good portrait of someone is that it should say something about that person that we feel is true. A good portrait sums up the character of the person or at least an aspect of their character. The pose, viewpoint, direction and quality of lighting, choice of lens, choice of background and the cropping of a picture can all contribute to the mood of the photograph and therefore what you are saying about that person.
"A good portrait is a picture that says something about the person, gives you an insight into the person's character, whether you believe it or not."
The most important item in the list above, by far, is the pose. Capturing the right moment is crucial and, with that in mind, it is important to take as many shots as you can. Each one will be slightly different, as you take pictures you will think up new ideas, the whole thing is an evolving process. Which brings me to one of the most important tips for successful portraiture.

"You must be ready for the action and work very quickly, seize the moment."
People, especially children, get bored very quickly. If you start fiddling with your camera telling them to hold on a minute you will never get good pictures. The most important part of the picture is the expression on the face. When you see that expression you must be ready to instantly capture it, everything else, the lighting, the background, the composition must be ready. Facial expressions, at least the good ones, are very fleeting things. If you ask someone to smile and you leave them holding that smile for even a second it will look very false.

When taking pictures of children I like to use a long lens and blend into the background. After a while they forget you are there then you start to get much more natural expressions. You need a lot of patience to work this way, you must not keep stopping them or trying to get them to turn in the direction you want because you will break the mood. Just keep watching be patient and be ready.
In closing, portrait photography is a very personal thing, new experiences and continuous shooting builds your portfolio, your confidence and communication skills with your model of choice. Every photoshoot is unique and must be handled differently, find the method that works for you, whether it be planning out every detail of a portrait shoot from location to wardrobe, models and make up or it may be as simple as being in the right place at the right time, keep your camera and gear ready, and generally having fun with any assignment.
Just remember when capturing life.. "Let the good stuff happen when it will."
Sunday, November 17, 2013
Here a sketch..there a sketch..

Putting ideas quickly on paper is the only way to evaluate them to see if they are worth exploring further. Computer renderings and modern CAD tools are great, but thinking on paper with a good old-fashioned pencil, pen, marker, sharpie, crayon is always the place to start.
Sketching is awesome. Personally this is the only way I know of starting the design process. Why sketching is great.
Your first idea is rarely your best.
Sketching is fast, rough, and dirty.
Learn to embrace your pencil and paper, and you’ll be thrilled at your speed of ideas. You’ll wonder why you ever fought it. You can make a series of thumbnail sketches, or they can be larger. As long as your sketches are good enough that they capture the necessary elements, drawing skill is unnecessary. By giving yourself the freedom to scrawl out rough ideas, you’ll get to creative places you could never have imagined.
You’ll save time.
Sometimes you have no choice but involve the client in all of the steps of the design. We don’t like the “big reveal” because when the process is kept a mystery, the end result is often a disappointment. We show clients a lot of sketches to show our intent. When a course correction is needed, we spend a few seconds sketching a revision, rather than taking hours to move pieces around in Photoshop.
It separates concepts from details.
It’s natural for people to focus on the wrong details when you first present a concept. If you take your idea straight to a design program, clients tend to zero in on that single blue color, or the first style of typography presented. This creates road blocks for communication when all you simply need is to know is, “Are we heading in the right direction?”
Sketching is for everyone.
I often hear people fret about sketching based on their lack of confidence in their drawing ability. Don’t worry! It is all about visual communication. Sometimes its about getting the idea/concept out of the client’s head and to the drawing board. Doodles from the client sometimes helps the process.
Lastly, sketching is fun!
When you stop worrying and allow your ideas to evolve, you’ll discover how enjoyable it is to sketch. Especially when you find your perfect pen and paper combo! Mine’s is a Sharpie Finepoint permanent marker and copy paper.
Here’s my challenge to you: The next time you’re given any sort of communication task, whether it’s a logo, a brand concept, or even a map with directions to your favorite coffee shop, try your hand at sketching. By incorporating sketching into your everyday tasks, you’ll find it makes an appearance in your professional routine as well.
Wednesday, November 6, 2013
If you Must work Late...work Smart.

Whether we like it or not, we often find ourselves awake at all hours of
the night, struggling to complete various tasks we haven't yet finished
in our day. Specifically graphic designers, we are always slaves to inspiration, or we promise the world and try to deliver. Here are a few tips that us late-night workers can
use to help us get through our work more easily and get us into bed.
EAT RIGHT TO SURVIVE
If it’s not possible for you to get sleep at all one night, you’re going to need to boost your energy levels somehow. If you have a high caffeine tolerance and you know it won’t make you jittery or restless, try coffee or tea while you study. Caffeine In small amounts can drastically improve your energy and focus for long nights of studying.
Please be aware of what you put into your body. It’s recommended to avoid energy drinks, for they often contain supplements to increase the negative effects of caffeine, such as increased heart rate, anxiety and shortness of breath.
Another good idea for all-nighters is to avoid sugary foods if you’re going to snack, because they can make you crash sooner. Instead, stick to a protein rich snack or fruit.
WATCH YOUR POSTURE
After sitting at a desk chair for hours on end, it is easy for your posture to droop and become poor. It's important to be aware of the tips for better posture for prolonged periods of time. Believe it or not, but simply adjusting the way you sit can help your time spent computing be more productive and comfortable.
TAKE BREAKS OFTEN
Straining your eyes to look at your computer screen for prolonged periods of time is never good. No matter how much work you have to do, it is imperative you take breaks to allow your eyes to rest. Breaks can be a good time to get a bit to eat or drink. We don't recommend taking any of those sugary energy drinks, however. We like to stick with a fruit smoothie to help reenergize ourselves.
MUSIC MATTERS
Play music in the background that can help you study or work and not put you to sleep. Whatever music helps you to get into your zone, use it. Be aware of who hears it and how loud it is so it won’t disturb others.
DE-STRESS
When you're up late working on a deadline for the next day, it can be quite a stressful situation to try and complete everything. It's crucial to stay calm at times like these and allow yourself some way to de-stress. You can try writing down your thoughts for starters, reflecting on what's stressful. Sharing your emotions can also relieve the stress, maybe talking with fellow classmates, colleagues or designers may help. Or you can find a peaceful healthy distraction.
Eliminating late nights often comes down to taking control of the way you manage your time on the clock. Spend it wisely.
Tuesday, October 22, 2013
Beach Photography Tips


1. Timing – Be late or be
early - If your into “landscape” photography,
this is the best advise for you. The “golden hour” gives you the most dramatic
images ever produced. Golden Hour refers to the couple hours around sunrise or
sunset. Every other regular Joe, enjoys the beach all day round. SO what do you
do then? On to tip two.

2. Know
The Limitations of Auto – If you’re shooting
in auto mode at the beach in the bright sun, your camera will probably be under-exposing your images. If you’re having
problems with the auto setting, then switch to manual or tone of the pre
configured modes on your point and shoot camera. Maybe Bright, Outdoor or
Beach.

3. Mind
Your Exposure Settings – A beach during the
day is really really bright. When shooting with an SLR, in such bright
conditions, you’re going to need a low ISO setting (100 - 400) in combination
with a narrow aperture (somewhere between (f14 and f22) with a fast shutter
speed.

4. Use Fill Flash
- When photographing people at the beach, portraits or
groups and it’s bright you’ll find that they will almost always have shadows on
their face, often cast by hats, glasses, noses, position of the sun etc. Switch
on your flash and force it to fire when shooting in these situations and you’ll
find the shadows may be eliminated and your actual subject is well exposed. As
a rule try shooting with the sun on your subject instead of behind it, unless
your trying to capture a silhouette image.

5. Look for interesting
Focal points – “All my beach images look the same, I
don’t bother carrying my camera to the beach anymore”. This is what a friend
once said to me. I think that’s really sad. Our twin island republic has excellent beaches with many photographic opportunities if
you have the ability to look beyond the cliche shots.
So go out to the beach this weekend or
right not for that matter. Try our tips, practice what you learned, experiment,
experiment, experiment, but most of all have fun, and keep capturing those
memories.
All Images Copyrighted © 2013 Razor Digital
Thursday, October 17, 2013
5 Tips for meeting Deadlines

Everyone has to deal with deadlines. When you were in school, you had homework assignments and long-term projects. In the world of work Deadlines are very important. To a designer it makes or breaks your reputation. You are as good as the work you present to your client, good work goes hand in hand with meeting your deadlines.
Here are some tips to help you succeed with meeting deadlines.
1. Stay Organized
If there's one sure way to miss a deadline, it's to completely forget about it. If you have a complicated schedule with lots of deadlines, meetings and projects going on, it's essential that you keep a calendar with all your deadline dates on it. In today's society the use of your smartphone, tablet or laptop can help keep things on track.
2. Don't Procrastinate
If a deadline is two weeks (or two months) away, it can be hard to get started during the first week. There's no sense of urgency. Procrastination might actually be the hardest thing to overcome. Luckily, the solution is pretty simple. All you have to do is break a project down into smaller parts, and then create a schedule that lets you complete each part at different points in the time leading up to the final deadline.
3. Delegate Smaller Tasks
You rarely have to complete a work project alone. If you have access to someone who is especially good at some aspect of the project, don't be too proud to let them get it done. As a friend or family member to help you type or research the project. A friend with a camera can assist with photos, another friend might be skilled with proof reading etc. Whatever the project, there is always someone you can call on for assistance. The moral of the story: It's easier to get things done when you have help.
4. Use a Soft Deadline
You might have everything planned and scheduled . Unexpected events can derail even the most solid plan. You can't plan for every possibility, so the best defense is a deadline cushion. If it's a two-week deadline, plan to have it done two days early. A two-month project could use a five-day cushion. Plan for the un expected. The more uncertainty built into your project, the larger your cushion should be.
5. Don't Promise the World.
Friday, September 27, 2013
Yahoo's New Logo.. Success or Epic Fail?
"I believe the font is ‘Meh Condensed." says CEO of Deep Focus Ad Agency Ian Schafer. Yahoo has refreshed its logo for the first time since shortly after the Internet company's founding 18 years ago. The redesigned logo retains some of the elements of the old one, including the company's official color, purple.
"We knew we wanted a logo that reflected Yahoo – whimsical, yet sophisticated. Modern and fresh, with a nod to our history. Having a human touch, personal. Proud." Marissa Mayer CEO Yahoo Inc.
After a 30-day tryout of dozens of new corporate logos Yahoo rolled out its final choice – to a chorus of boos. The old design was fun and unexpected, seeming to sum up
all of the joys of the internet but this new choice looks dull and corporate. The bevel does not add any positivity to the lettermark and the color choice seems very rigid and cold.


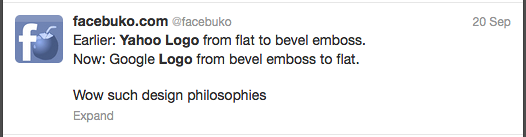


Love it or Hate it.. Yahoo's New Logo in my opinion fails to impress, but people are talking about it!
Yahoo has refreshed its logo for the first time since shortly after the Internet company's founding 18 years ago.
Read more at: http://phys.org/news/2013-09-yahoo-unveils-logo.html#jCp
Read more at: http://phys.org/news/2013-09-yahoo-unveils-logo.html#jCp
Yahoo has refreshed its logo for the first time since shortly after the Internet company's founding 18 years ago.
Read more at: http://phys.org/news/2013-09-yahoo-unveils-logo.html#jCp
Read more at: http://phys.org/news/2013-09-yahoo-unveils-logo.html#jCp
Yahoo has refreshed its logo for the first time since shortly after the Internet company's founding 18 years ago.
Read more at: http://phys.org/news/2013-09-yahoo-unveils-logo.html#jCp
Read more at: http://phys.org/news/2013-09-yahoo-unveils-logo.html#jCp
Yahoo has refreshed its logo for the first time since shortly after the Internet company's founding 18 years ago.
Read more at: http://phys.org/news/2013-09-yahoo-unveils-logo.html#jCp
Read more at: http://phys.org/news/2013-09-yahoo-unveils-logo.html#jCp
Yahoo has refreshed its logo for the first time since shortly after the Internet company's founding 18 years ago.
Read more at: http://phys.org/news/2013-09-yahoo-unveils-logo.html#jCp
Read more at: http://phys.org/news/2013-09-yahoo-unveils-logo.html#jCp
Yahoo has refreshed its logo for the first time since shortly after the Internet company's founding 18 years ago.
Read more at: http://phys.org/news/2013-09-yahoo-unveils-logo.html#jCp
Read more at: http://phys.org/news/2013-09-yahoo-unveils-logo.html#jCp
Yahoo has refreshed its logo for the first time since shortly after the Internet company's founding 18 years ago.
Read more at: http://phys.org/news/2013-09-yahoo-unveils-logo.html#jCp
Read more at: http://phys.org/news/2013-09-yahoo-unveils-logo.html#jCp
Yahoo has refreshed its logo for the first time since shortly after the Internet company's founding 18 years ago.
Read more at: http://phys.org/news/2013-09-yahoo-unveils-logo.html#jCp
Read more at: http://phys.org/news/2013-09-yahoo-unveils-logo.html#jCp
Tuesday, September 24, 2013
Photography Tips for Beginners


Most photos look better it your subject isn't centered. Almost all digital cameras and ever popular Iphone has a Grid option or format. This consists of vertical and horizontal lines that when over-layed split the image into nine sections. Place items of focus (your subject) on these lines or intersections for a better composition.

Memory Cards and different storage devices are relatively cheap nowadays. It is always best to take Hi-Resolution photos, because you can always edit a photo down for Facebook or any other social media, but you can never quite fix a "bad" jgeg that is low in quality and resolution to begin with.

The perfect exposure requires the right setting on each of the required fields: ISO, Aperture and Shutter Speed. To explain briefly then, these three factors determine everything.
Aperture determines the focal length and is the size of the physical opening to the lens. A higher number means there’s a smaller hole letting light in, which results in more of the background being sharp and in focus. A smaller number is a larger opening, so background objects appear out of focus.
Shutter Speed is how long the shutter remains open for, allowing more light in. Leaving it open for a longer time will show motion in a photo, while a short time will show a single moment.

TIP 4: Experiment with you Point of View.
Most people take photos at eye level, right? Boring. Move the camera either up or down for a more interesting shot. Experiment with putting the camera high above your head or close to the ground, for example.

Even your most basic point and shoot will have at least:
Automatic mode where the camera will make a best guess.
Programmed mode where certain characteristics are pre-determined.
On a DSLR, you’ll find a few other modes, and it’s important you
understand those too. These modes allow you to set a particular variable
and let the camera work out the best values for the others.
Av: Aperture Value. This is the most widely used
mode for general shooting and gives you control over the Aperture. The
camera will calculate the best shutter speed and exposure to use.
Tv: Time Value. This gives you control over the shutter speed, allowing you to capture either motion or a single moment. The camera will calculate the best aperture and exposure values to use.
Tv: Time Value. This gives you control over the shutter speed, allowing you to capture either motion or a single moment. The camera will calculate the best aperture and exposure values to use.
Friday, September 20, 2013
Designer 101 - Things every Client should know..
 |
| Photo Credit: Colin Harmon. |
Alot of the times we have clients who ask for the impossible and lots of times, we as designers would love to tell them, "to go to hell". But sadly, after lots of deliberation we decide against our better judgement. This list contains a few of the things every client should know, when hiring a graphic designer.
1. Freelance doesn't mean FREE
A professional graphic artist, a freelancer puts in alot of effort, such as researching your brand, company, personal taste and your competitors to ensure you receive a quality design worthy of your business goals and a paycheck.
2. Can you just Photoshop it: NO..!
Yes as designers we can use all the latest design tools but we are more than that. We know all the principles and elements of good design. Trust in your designer to give you what you are paying for. For example tell your designer that you want colours that attract males, instead of just saying..Make it Blue.
3. Less is More. White Space Rules!
Why respect white space? A minimalistic view is elegant, white space attracts attention and gives design a level of sophistication. A design that stands out has the right balance of white space and information.
4. You get what you Pay for.
Great design takes time and effort. Time, effort and expertise is not cheap. Enough Said.. 5. I believe, You believe..
Hire a designer who believes what you do. Although unrelated to graphic design. Individuals with a similar work ethic and like morals tend to produce quality work. For example a graphic designer who is also an animal rights activist may not design on advertising campaigns for products where animal testing is condoned. It isn't always about the money.
Feel free to add to the list via the comments section..
Thursday, September 19, 2013
Cutting Pixels to size...Creativity simplified.

Hello Digital World!
The purpose of this Blog is to generate awareness for a new and upcoming graphic design studio in Trinidad & Tobago - Razor Digital.
I plan to achieve this goal by discussing the challenges or successes that occur during our design process here. Posts on this Blog will also contain any element from our Core offerings, these include Corporate & Print Design, Web Design, Illustration and Photography. We will also post real world reviews of design and photography tools used in the industry today.
Join us, "Like Us" "Follow Us" as we embark on a journey of reflection, fact and goal oriented idea generation.
Subscribe to:
Posts (Atom)